
messenger_llama2.md 8.9 KB
Building a Llama-enabled Messenger Chatbot
This step-by-step tutorial shows the complete process of building a Llama-enabled Messenger chatbot. A demo video of using the iOS Messenger app to send a question to a Facebook page and receive the Llama 2 generated answer is here.
If you're interested in a Llama-enabled WhatsApp chatbot, see here for a tutorial.
Overview
Messenger from Meta is a messaging service that allows a business' Facebook Page to respond to people who are interested in their busines using Messenger Platform. The benefits of an intelligent and knowledgable Llama 2 powered chatbot are obvious, including cost saving and better customer experience such as 24x7 availability. In this blog, we'll cover the details of integrating Llama 2 with the Messenger Platform to build a basic Llama 2 enabled chatbot - see Llama 2 demo apps for more Llama 2 application development and deployment demos such as how to integrate your own data with Llama 2.
The diagram below shows the components and overall data flow of the Llama 2 enabled Messenger chatbot demo we built, using Amazon EC2 instance as an example for running the web server.

Getting Started with Messenger Platform
A Facebook Page is required to send and receive messages using the Messenger Platform - see here for details about Facebook Pages and how to create a new page.
If you have followed the [Llama WhatsApp chatbot tutorial](), or if you already have a Meta developer account and a business app, then you can skip this step. Otherwise, create a Meta developer account and create a business app.
Add the Messenger product to your business app by going to your app's Dashboard, click "Add Product" and then select "Messenger".
Configure a webhook to receive real time HTTP notifications: follow the Sample Callback URL for Webhooks Testing Guide to create a free account on glitch.com to get your webhook's callback URL, but you can skip the WHATSAPP_TOKEN related part in the guide - the rest of the setting up webhook is the same for WhatsApp and Messenger.
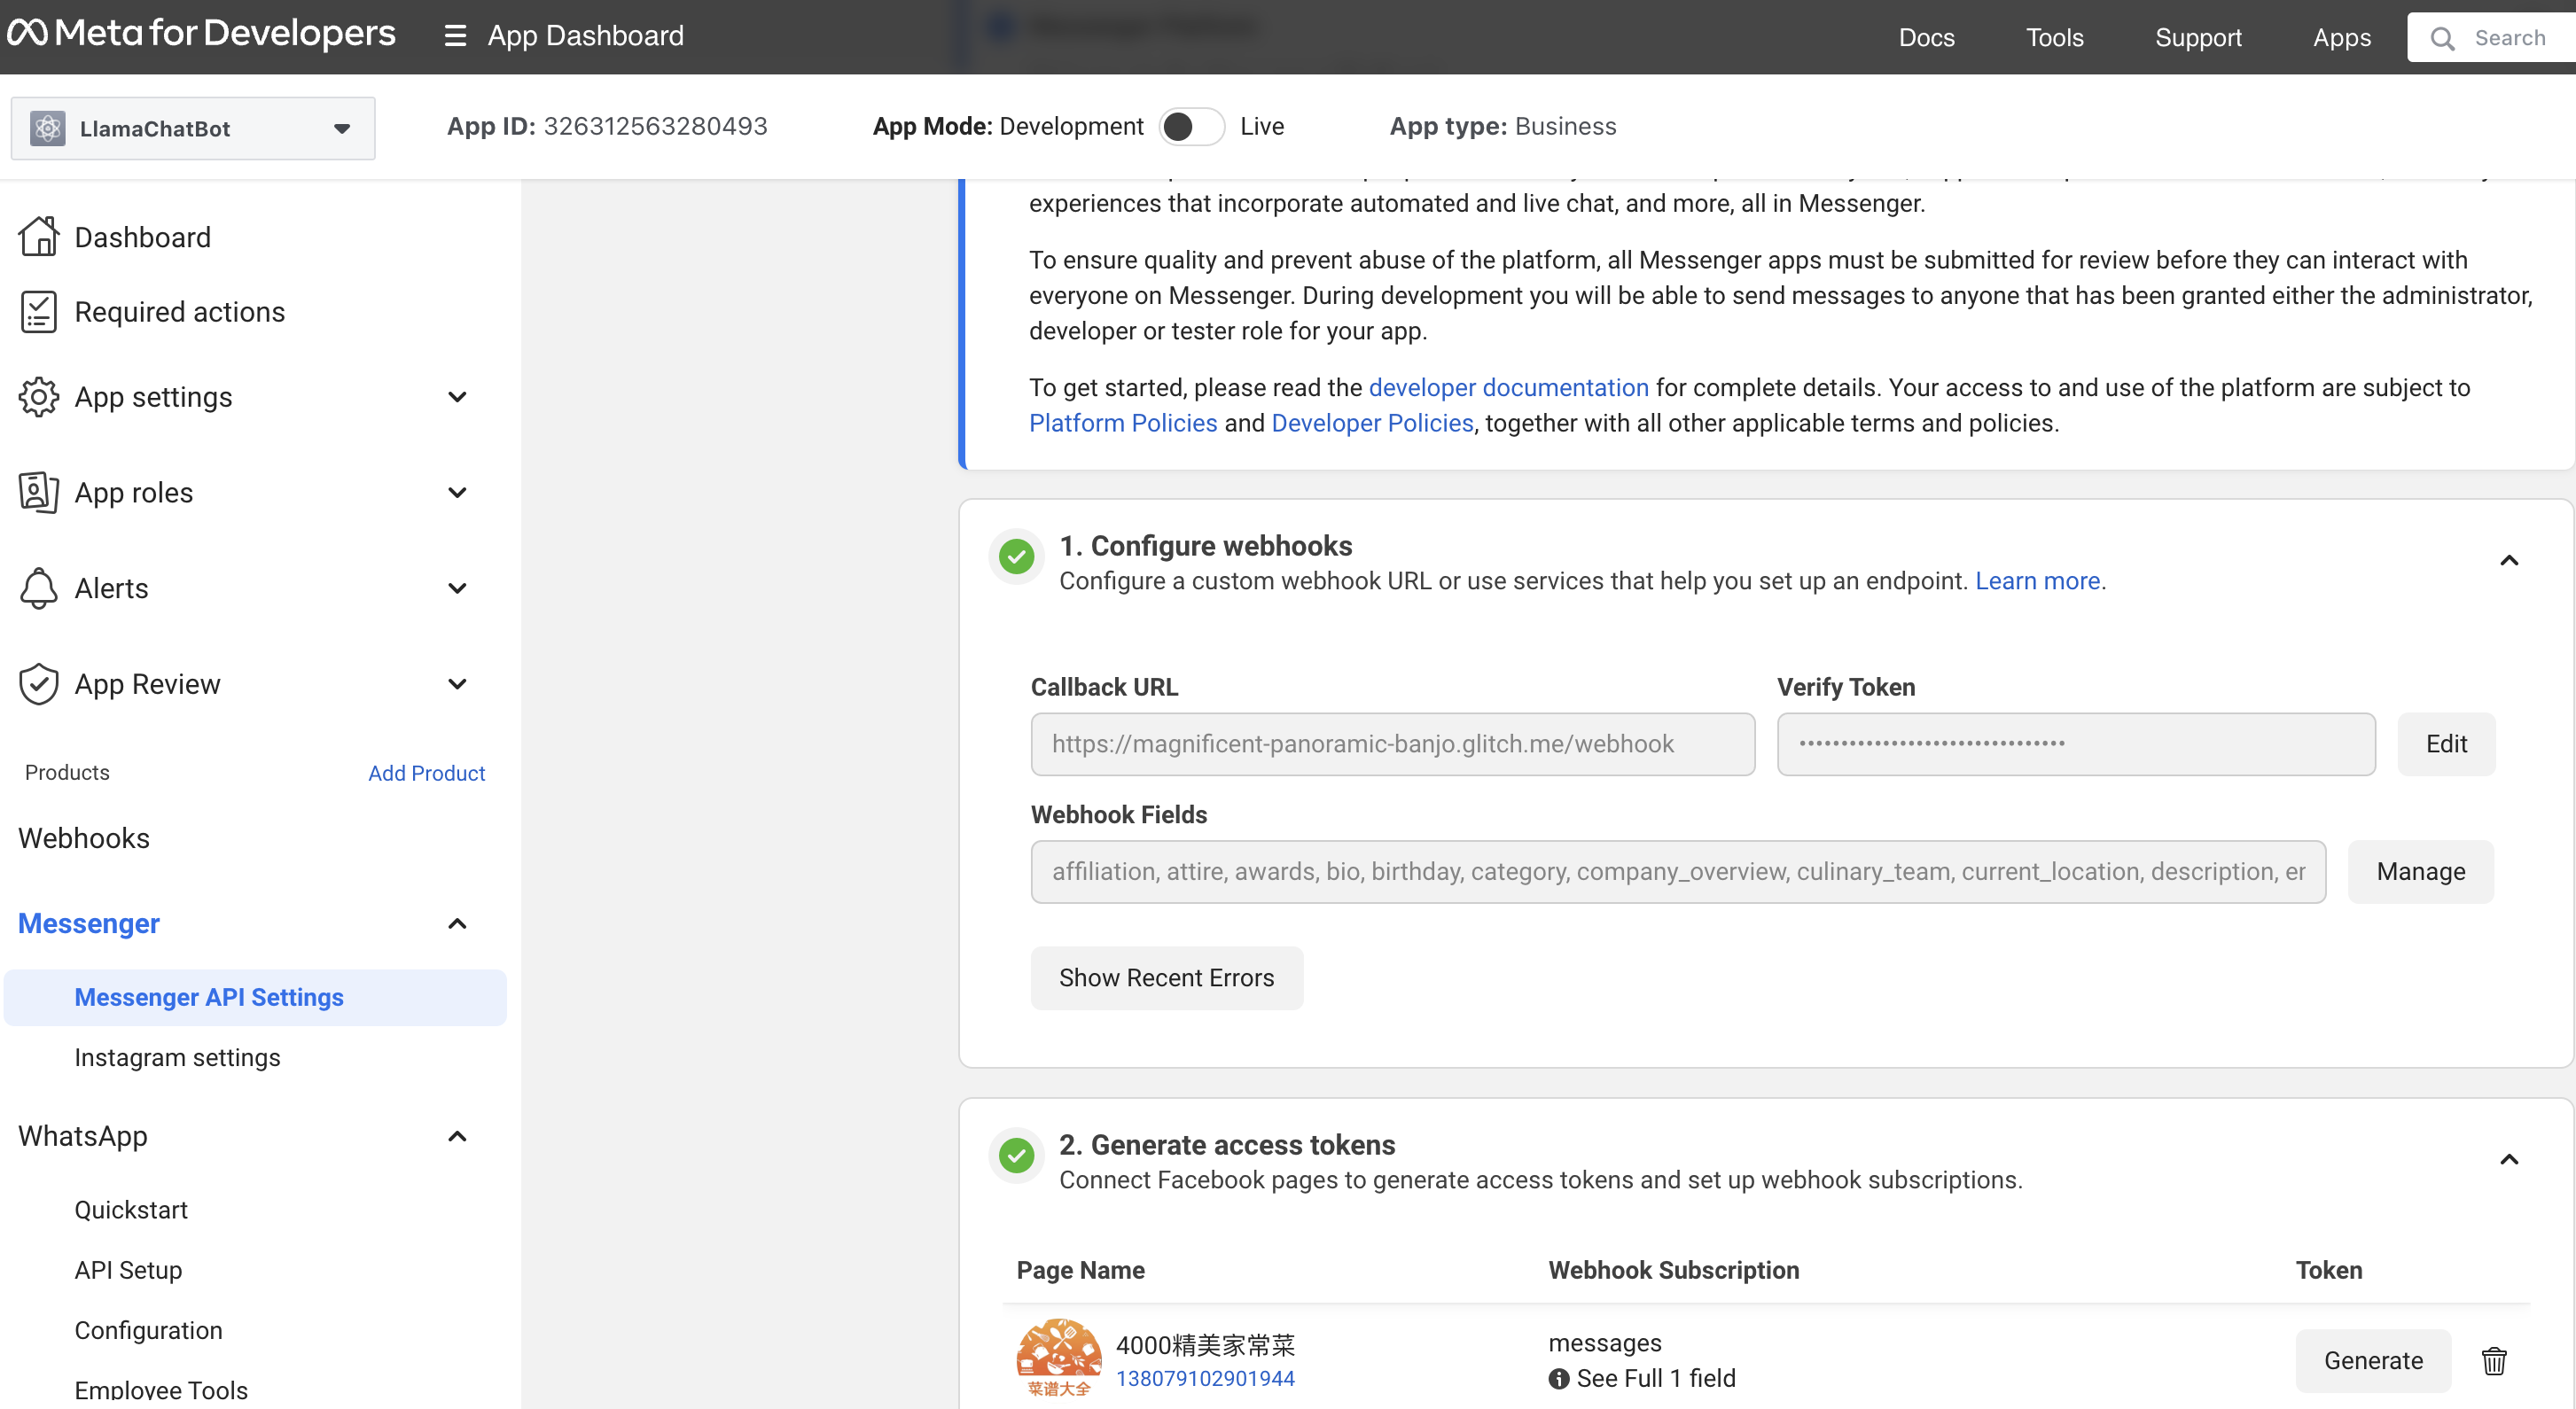
Open Messenger's API Settings, in "1. Configure webhooks", set the Callback URL and Verify Token set up in the previous step, and subscribe all message related fields for "Webhook Fields". Finally, in "2. Generate access tokens", connect your Facebook page (step 1) and copy your page access token.
Writing Llama 2 Enabled Web App
The Python-based web app we developed uses LangChain, an open source LLM development framework, and Replicate, a service provider hosting LLM models in the cloud, to receive the user query sent by the webhook, which will be covered in the next section, pass the query to Llama 2, and send the Llama 2 answer back to the webhook. For more information on how to use LangChain and Replicate to develop Llama 2 apps, see the Llama 2 demo apps - you may also replace Replicate with other Llama deployment options shown in the demo apps.
First, let's create a new conda (or you can use venv if you like) environment and install all the required packages:
conda create -n messenger-llama python=3.8
conda activate messenger-llama
pip install langchain replicate flask requests uvicorn gunicorn
Then, create a Python file named llama_messenger.py that creates a Llama 2 instance and defines an HTTP method msgrcvd_page to:
- receive the user message forwarded by the webhook;
- ask Llama 2 for the answer;
- send the answer back to the sender using the Facebook graph API.
import langchain
from langchain.llms import Replicate

from flask import Flask
from flask import request
import os
import requests
import json

os.environ["REPLICATE_API_TOKEN"] = "r8_dR6bALmiSCZCZRs3JKuxkMYxkEW8b2Z0oDwCm"
llama2_13b_chat = "meta/llama-2-13b-chat:f4e2de70d66816a838a89eeeb621910adffb0dd0baba3976c96980970978018d"

llm = Replicate(
    model=llama2_13b_chat,
    model_kwargs={"temperature": 0.01, "top_p": 1, "max_new_tokens":500}
)

app = Flask(__name__)

@app.route('/msgrcvd_page', methods=['POST', 'GET'])
def msgrcvd_page():
    message = request.args.get('message')
    sender = request.args.get('sender')
    recipient = request.args.get('recipient')

    answer = llm(message)

    url = f"https://graph.facebook.com/v18.0/{recipient}/messages"
    params = {
        'recipient': '{"id": ' + sender + '}',
        'message': json.dumps({'text': answer}),
        'messaging_type': 'RESPONSE',
        'access_token': '<your_page_token>'
    }
    headers = {
        'Content-Type': 'application/json'
    }
    response = requests.post(url, params=params, headers=headers)

    return message + "<p/>" + answer
Now it's time to modify the webhook to complete the whole app.
Modifying the Webhook
Open your glitch.com webhook URL created earlier, and change your app.js to simply forwards the user message received by the Messenger Platform to the Llama 2 enabled web app llama_messenger.py described in the previous section:
"use strict";

// Imports dependencies and set up http server
const request = require("request"),
  express = require("express"),
  body_parser = require("body-parser"),
  axios = require("axios").default,
  app = express().use(body_parser.json()); // creates express http server

// Sets server port and logs message on success
app.listen(process.env.PORT || 1337, () => console.log("webhook is listening"));

// Accepts POST requests at /webhook endpoint
app.post("/webhook", (req, res) => {
  // Parse the request body from the POST
  let body = req.body;

  let sender = req.body["entry"][0]["messaging"][0]['sender']['id']
  let recipient = req.body["entry"][0]["messaging"][0]['recipient']['id']
  let message = req.body["entry"][0]["messaging"][0]['message']['text']

  // Check if this is an event from a page subscription
  if (body.object === "page") {
    // Returns a '200 OK' response to all requests
    res.status(200).send("EVENT_RECEIVED");

  let url = "http://<web server public IP>:5000/msgrcvd_page?sender=" + sender + "&recipient=" + recipient + "&message=" + encodeURIComponent(message)

  axios.get(url)
    .then(response => {
      // Handle the response data
      console.log(response.data);
    })
    .catch(error => {
      // Handle errors
      console.error('Axios error:', error);
    });
  } else {
    // Return a '404 Not Found' if event is not from a page subscription
    res.sendStatus(404);
  }

});

// Accepts GET requests at the /webhook endpoint. You need this URL to setup webhook initially.
// info on verification request payload: https://developers.facebook.com/docs/graph-api/webhooks/getting-started#verification-requests
app.get("/webhook", (req, res) => {
  /**
   * UPDATE YOUR VERIFY TOKEN
   *This will be the Verify Token value when you set up webhook
  **/
  const verify_token = process.env.VERIFY_TOKEN;

  // Parse params from the webhook verification request
  let mode = req.query["hub.mode"];
  let token = req.query["hub.verify_token"];
  let challenge = req.query["hub.challenge"];

  // Check if a token and mode were sent
  if (mode && token) {
    // Check the mode and token sent are correct
    if (mode === "subscribe" && token === verify_token) {
      // Respond with 200 OK and challenge token from the request
      console.log("WEBHOOK_VERIFIED: " + token);
      res.status(200).send(challenge);
    } else {
      // Responds with '403 Forbidden' if verify tokens do not match
      res.sendStatus(403);
    }
  }
});
Remember to change , which needs to be publicly visible, to the IP of the server where your Llama 2 enabled web app in the previous section runs.
Running the Chatbot
On your web server, run the following command on a Terminal:
gunicorn -b 0.0.0.0:5000 llama_messenger:app
If you use Amazon EC2 as your web server, make sure you have port 5000 added to your EC2 instance's security group's inbound rules. Write down your web server's public IP, update the URL below with it, then open the URL in a browser to verify you can see the answer sent to your Messenger app, as well as shown in the browser:
http://<web server public IP>:5000/msgrcvd_pager?sender=<user id>&recipient=<page id>&message=<msg>
Now you can open your Messenger app, enter a question and receive the Llama 2's answer shortly, as shown in the demo video in the beginning of this post.